
If you have ever stared at a beloved pair of jeans with a frayed knee and wished you could fix them without making them look patched, let me introduce you to the meditative world of sashiko embroidery for beginners. This Japanese darning technique uses simple running stitches to create geometric patterns that actually strengthen the fabric. I discovered it a few years ago when a pair of vintage Levis I had hunted for months got a mysterious hole in the thigh. A friend showed me how to cover it with a few lines of white thread, and honestly, it looked better than the original. Now, I turn almost every tear or stain into an excuse to stitch. If you are curious about visible mending, this is the most satisfying place to start.
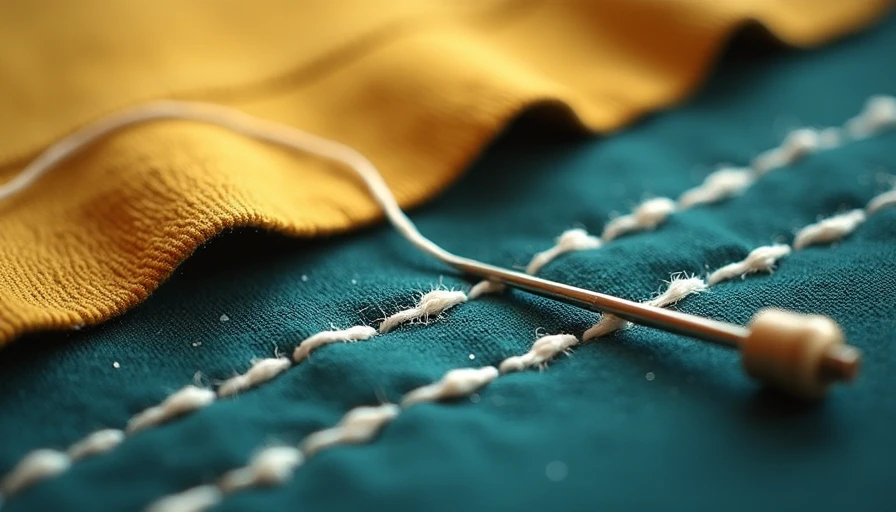
Sashiko literally means "little stabs" in Japanese, and that is exactly what you do: make even, small running stitches across the damaged area. Unlike embroidery, which often focuses on decorative motifs, sashiko is functional. It was originally used in rural Japan to reinforce worn workwear. The beauty of sashiko embroidery for beginners is that you do not need any prior sewing experience. The stitch is just a straight line, repeated over and over. The magic comes from the pattern you create: parallel lines, intersecting grids, or gentle curves. You can buy pre-printed fabric or draw your own lines with a disappearing marker.
The first thing you need is a sashiko needle. These are slightly longer and thicker than embroidery needles, with a large eye to hold the chunky cotton thread. Sashiko thread is usually twisted, so it glides through the fabric smoothly. For your first project, pick something sturdy: a pair of denim jeans, a canvas tote, or a linen shirt. Thin cotton might be too delicate. I recommend starting with a kit from a brand like Oliso or Auri – they sell bundles with thread, needles, and a printed cloth panel. Expect to spend about $20. You will also need a thimble, especially if you are working on denim, and small scissors.

What Is Sashiko Embroidery?
Sashiko is a form of decorative reinforcement stitching that dates back to the Edo period in Japan. It was born from necessity: farmers and fishermen needed to extend the life of their hemp work clothes. They would layer patches of fabric and then stitch through all layers with white cotton thread. Over time, those functional stitches turned into art. The most common pattern is the hitomezashi, where you stitch guidelines from one edge to the other. The spacing between stitches is just as important as the stitch length itself. For beginners, the goal is to keep each stitch about 1/8 inch long and the gaps consistent. Your first piece might be uneven, but that is part of the charm. Sashiko embroidery for beginners is less about perfection and more about practice.
Why Start with Sashiko?
I love sashiko because it gives clothes a second life without hiding the story. A ten-dollar repair kit can keep a fifty-dollar garment out of the landfill. Plus, the repetitive motion is surprisingly relaxing. I often stitch while watching a movie or listening to a podcast. It is also incredibly forgiving: if you make a row of stitches too short or too long, you can simply redo it. The thread is thick enough that the next row will cover any tiny mistakes. Sashiko embroidery for beginners is a low-risk, high-reward craft. You do not need a hoop, you do not need pattern transfer skills – just a ruler (or a piece of tape) to guide your lines.
Choosing Your First Kit
Head to your local fabric store or search online for "sashiko starter kit." Look for one that includes a pre-printed cloth, a needle pack, and two or three colors of thread. I like the kits from Etsy sellers who source from Japan, but even the ones on Amazon are fine for a first try. Avoid kits that come with thin polyester thread – real sashiko thread is 100% cotton and slightly waxed. The thread should feel firm, not fuzzy. You will also want a needle with a sharp point, not a ballpoint. If you already have sewing supplies, you can improvise: use a regular crewel needle and pearl cotton size 8. But for the full experience, get a proper sashiko needle.
Step-by-Step Basics
- **Prepare your fabric.** Wash and iron the garment. If you are covering a hole, place a small patch of matching fabric behind it. Pin it in place.
- **Draw guidelines.** Use a water-soluble marker or chalk to draw parallel lines, spaced about 1/4 inch apart. You can also use ruler and pencil for dark fabrics.
- **Thread your needle.** Use a single strand of sashiko thread, about 18 inches long. Do not knot the end – leave a 2-inch tail.
- **Start stitching.** Bring the needle up from the back of the fabric, then take small running stitches along your guideline. Keep your stitches even: about 1/8 inch long with 1/8 inch between them. Repeat across the row.
- **Finish a row.** At the end, bring the needle to the back and weave the tail through the stitches to secure it. Do not use a knot.
- **Add more rows.** Work your way across the damaged area, keeping the rows parallel. For a simple grid, add perpendicular rows after the first set.
- **Wash away marks.** When you are done, rinse the garment in cold water to remove the marker.
Styling Your Mended Clothes
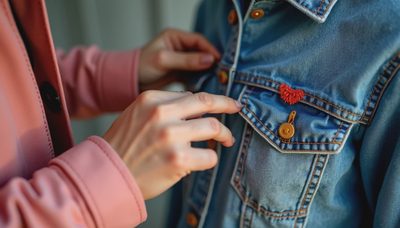
Once you have a few mends under your belt, think about how they fit into your wardrobe. A row of white sashiko stitches on a dark denim jacket looks intentional and cool. You can also add patches of contrasting fabric underneath – try a scrap of floral cotton under a hole in a plain linen shirt. The stitches become a frame for a tiny hidden print. I have a pair of gray trousers that I mended with navy thread, and now I wear them more often than before the rip. Sashiko embroidery for beginners is not just about repair; it is about making your clothes into something only you have.
Final Thoughts
I do not want you to think that every stain needs stitches. Some things are beyond saving, and that is okay. But sashiko has changed how I see small holes and faded spots. Instead of frustration, I feel a spark of creativity. If you try one mending technique this year, let it be sashiko embroidery for beginners. The materials are cheap, the skills are simple, and the result is a piece of clothing that carries your own hands. Wear it again, but better.


Travellers Write
No letters yet — be the first traveller to write.