
I want to address the aesthetic of visible mending content online before we go any further, because I think it does the practice a disservice.
Most visible mending you'll encounter on Instagram or Pinterest is genuinely beautiful — intricate sashiko stitching across the full knee of a pair of jeans, detailed floral embroidery covering a stain on a linen dress, neat darning on a cashmere sweater that looks almost like it was planned from the beginning. It's impressive work, and looking at it is a real pleasure.
It's also not where you start.
Looking at expert visible mending and then trying to pick up a needle and thread is like watching professional knife skills videos and then expecting to julienne vegetables properly on your first try. The gap is wide enough that most people feel immediately inadequate, put the needle down, and donate the item instead.
I started visible mending about two years ago with genuinely mediocre results. My first sashiko-inspired running stitch on a pair of jeans looked like I'd let a caffeinated child draw on them with thread. My first embroidered motif was small, slightly lumpy, and placed at a slightly wrong angle. My first seam repair was functional and invisible from three feet away, which was all it really needed to be.
Here's what I learned from starting badly and continuing anyway.

The Only Three Stitches Worth Learning First
Most visible mending tutorials will tell you about running stitch, backstitch, and stem stitch. Some will immediately jump into sashiko patterns or darning. All of this is real and useful eventually. But the honest beginner path is narrower than most guides suggest.
The running stitch is the only stitch you need to start.
A running stitch is exactly what it sounds like: you push the needle in and out of the fabric in a line, creating a dashed line of stitches. That's it. It creates texture, it reinforces fabric, it can be decorative, and it requires no skill to execute — only patience and a willingness to accept that your line might not be perfectly straight.
What you can do with a running stitch:
Cover an area of thin or damaged fabric on jeans or heavyweight cotton by stitching across it in a grid or diagonal pattern
Reinforce a seam that's starting to come undone from the outside, decoratively
Create a simple geometric pattern on a patch
The reason I'm not listing more stitches here is that adding complexity before you've done twenty or thirty running-stitch repairs in different contexts is the thing that makes people quit. Master one stitch until it feels comfortable. Everything else follows from that.
The backstitch is the second thing worth learning, specifically for repairing seams and joining fabric. It's a little harder than running stitch — each stitch connects back to the previous one, creating a continuous line rather than a dashed one — but it's stronger and looks more intentional. I'd learn this after you've done three or four running-stitch repairs.
The third stitch worth knowing early is a simple whipstitch, useful for patching holes where two fabric edges need joining. But honestly, you can do most basic visible mending for a year before you actually need this one.
About embroidery specifically. Decorative embroidery — floral motifs, geometric patterns, covering stains — is wonderful and achievable for beginners, but I'd start with it as a separate practice from garment repair. Buy a cheap embroidery hoop, some practice fabric, and a basic embroidery book or YouTube tutorial. Learn the stitch on practice fabric before you put it on something you care about. The first time I embroidered directly onto a garment I loved, I already had about ten hours of practice stitching in my hands, and it still came out slightly imperfect. That imperfection was charming. On a garment I'd never embroidered before, it would have been stressful.
What to Mend First
The choice of first project matters more than most mending guides acknowledge, because starting with something too difficult or too precious will end the practice before it starts.
Best first projects:
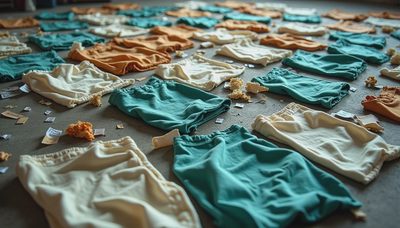
Jeans with wear at the inner thigh or knee. This is the ideal starting point because: the fabric is denim, which is forgiving to work with; the repair is expected to look handmade and slightly rough; the area is large enough that your stitch lines don't need to be precise; and denim is a low-stakes fabric that most people have in quantity. A running stitch grid across thinning denim, in a thread that contrasts slightly — rust or cream on dark denim — is probably the most forgiving visible mend you can do and also one of the most satisfying.
A loose or coming-undone seam on a mid-weight garment. If a seam is separating on a cotton shirt or linen jacket, a backstitch repair along the outside of the seam, in a contrasting thread, is a useful and visible repair that's well within beginner skill level and genuinely extends the life of the garment.
A small stain on something you like but weren't going to keep otherwise. If you have a piece with a stain that makes it unwearable — a mark on a linen shirt, a spot on a cotton dress — and you'd otherwise be donating it, this is the perfect practice garment for embroidery. The stakes are zero. If it goes wrong, the outcome is the same as doing nothing. If it goes right, you have a saved garment.

Worst first projects:
Cashmere. I know it's tempting because cashmere gets holes and the holes are heartbreaking. But cashmere is a fine, delicate fiber that's genuinely difficult to work with as a beginner. The stitches pull differently, the fiber is fragile, and a bad repair on cashmere looks worse than a bad repair on most other fabrics. Save cashmere until you have some experience.
Anything sentimental with no room for error. A garment you love deeply and couldn't replace is not the right place to practice. The emotional pressure will tighten your stitches, rush your decisions, and produce worse results. Practice on the things you're ambivalent about first.
Silk. Similar reasoning to cashmere — delicate, slippery, unforgiving. Later.
The Mindset Shift That Made It Work
The thing that made visible mending click for me — beyond the technical practice — was a reframe about what I was trying to achieve.
Most people approach visible mending as though the goal is to make the repair look as good as possible, which means measuring themselves against expert work they've seen online. That's a recipe for constant inadequacy.
The actual goal, especially at the beginning, is to keep something you like in circulation. That's it. If a slightly uneven running stitch across the knee of your favorite jeans means you keep wearing them for another two years, the stitch has fully succeeded regardless of how it looks. The visible-mending-as-art outcome — the beautiful, intentional repair that makes the garment more interesting than it was before — is a bonus, not the baseline.
I have mends on garments currently in my closet that are clearly beginner work. The stitch lines aren't perfectly even, the thread tension is slightly inconsistent, one embroidered motif is placed about three millimeters lower than I intended. I wear these things regularly and feel fine about it, because the repairs work. The clothes are still in use.
Visible mending is a practice in the same sense that yoga or cooking is a practice — you get better over time, but you don't need to be advanced to benefit from it. The beginner version is genuinely useful, and it's available on the first try.
Start with running stitch on denim. See what happens.


Travellers Write
No letters yet — be the first traveller to write.